In this post, we’ll explore the various methods and tools you can use to record your Android device’s screen. Whether you’re creating a tutorial, capturing gameplay, or sharing your digital exploits with friends, screen recording on Android has never been easier.
How to Use the Built-In Screen Recording Feature on Android 11 and Later Versions
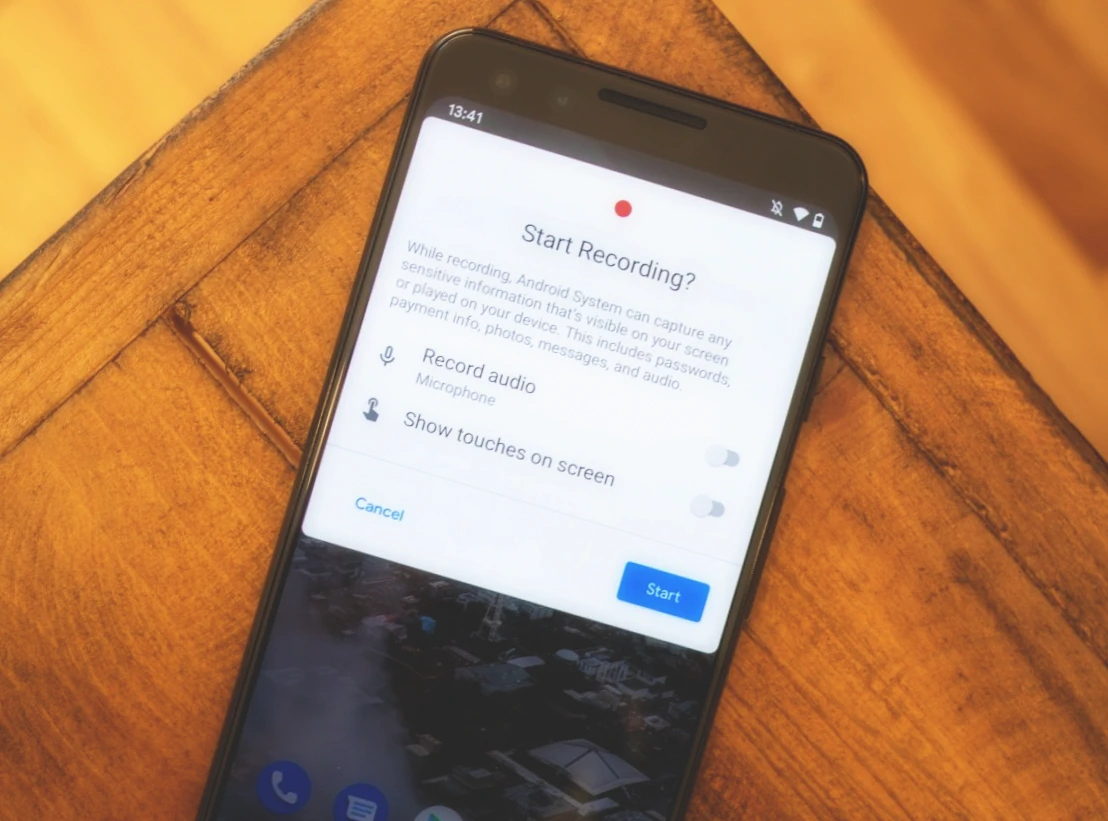
Starting from Android 11, Google introduced a native screen recording feature, making it easier than ever to record your screen without the need for third-party apps. In this section, we’ll guide you through the process of using this built-in feature.
Step-by-step Guide:
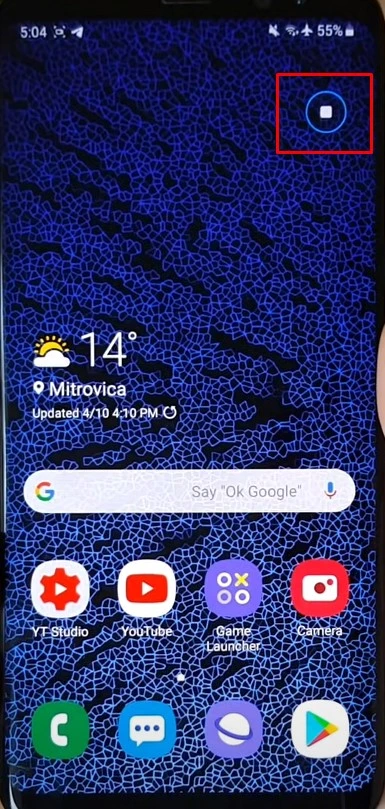
Access Quick Settings: Swipe down from the top of your screen to access your device’s quick settings panel.
Find Screen Record: Locate the “Screen Record” button. If it’s not visible, tap the edit (pencil) icon and drag the “Screen Record” button to your quick settings panel.

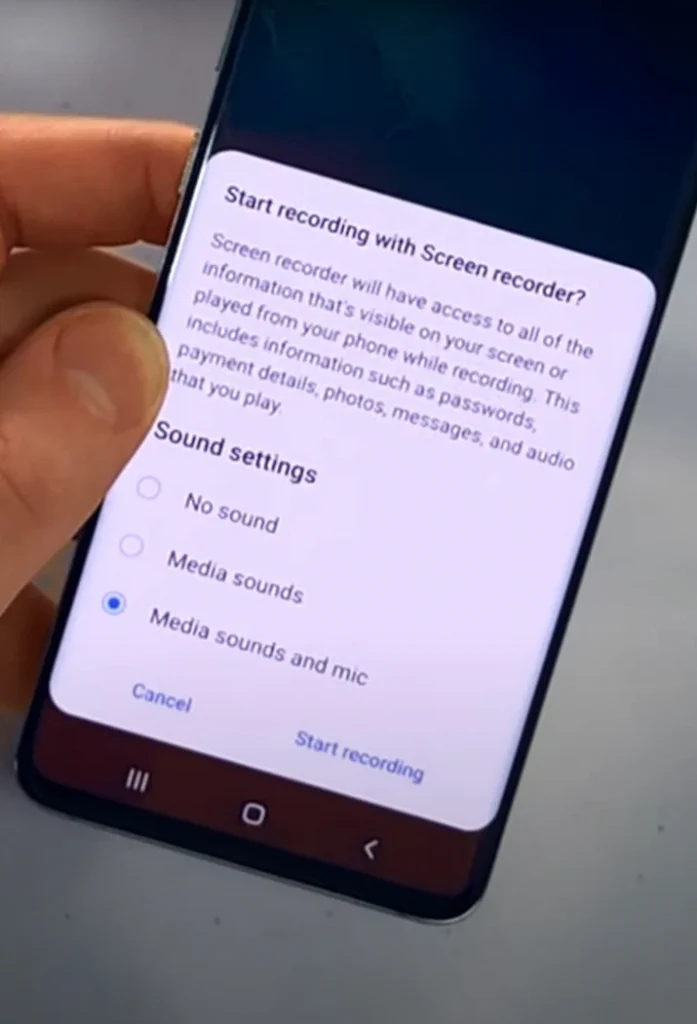
Configure Recording Settings: Tap the “Screen Record” button to open the recording settings. You can choose to capture audio from your microphone, device audio, or both. Additionally, you can choose whether to show touches on the screen during the recording.
Start Recording: Tap “Start” to begin recording. A countdown will appear, giving you time to prepare your screen.
Control the Recording: You can pause, resume, or stop the recording by accessing the notification panel.
Save and Share: Once you’ve stopped the recording, the video file will be saved to your device. You can then view, edit, or share the video as desired.
How to Activate and Use the Built-In Screen Recording Feature on Android 10
Android Q (or Android 10) comes with a built-in screen recording feature that works on all devices that support this version of the operating system. However, by default, this feature is not activated. To enable it, you need to activate the developer options:
- Open the “About Phone” section in your device’s settings.
- Go to the “Software Information” section.
- Scroll down to the build number and tap on it several times. This will activate the Developer Mode.
- Go to the Settings section and open the new “Developer Options” or “For Developers” subsection.
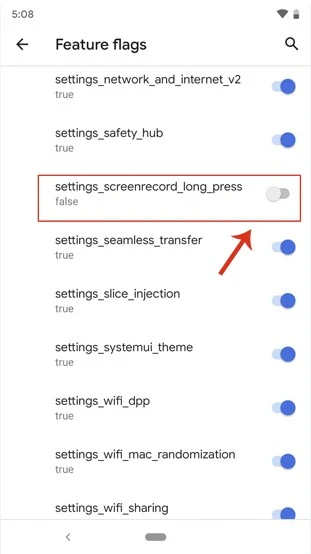
- Go to the “Debugging” section and find the “Feature flags” item.
- Find the “settings_screenrecord_long_press” option in the list and move the slider next to it to the “Enabled” position.
Once you have activated this option, you can launch the built-in screen recording utility for your device. To start recording, hold down the power button on your smartphone and then press the key to create a screenshot. A menu will appear with the words “Start Recording.” Tap on this button, and a warning will appear that all of your actions will be saved on video. Click on the “Start Now” button, and the recording will begin.
A new Screen Recording window will appear in the Quick Settings and Notifications panel. There will be buttons to control the recording: start, pause, and stop. By default, the video clip recorded in this way is saved in the gallery in the built-in memory of your device.
However, keep in mind that you cannot take a screenshot while capturing video data from the display of your device as it may cause a recording error.
Screen Recording on Android with Google Play Games
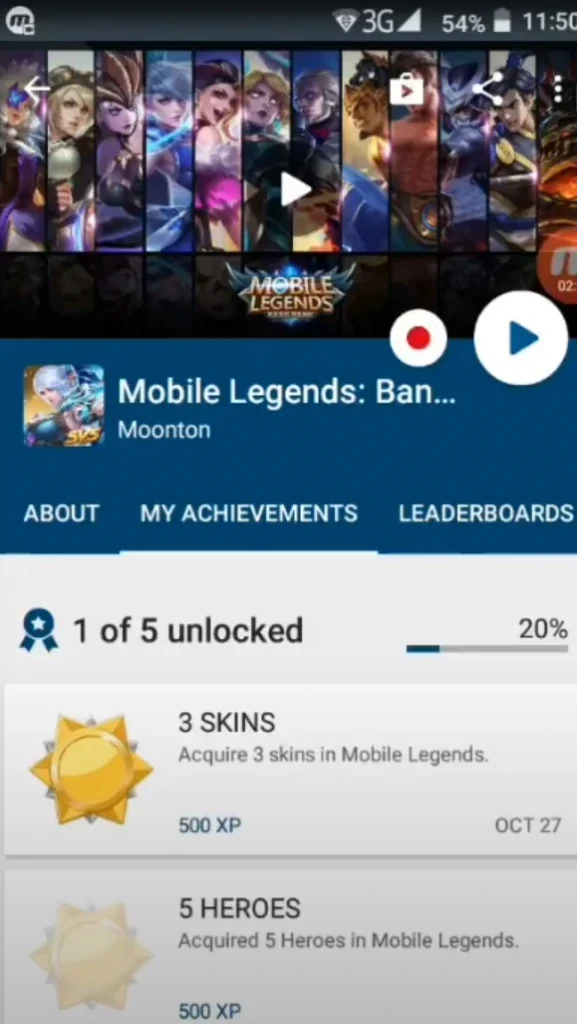
The Google Play Games app is not just for playing modern games, it also offers tools for working with content. Some of the key features of this gaming platform include Google Games, a custom gamer profile, achievements, and arcade.
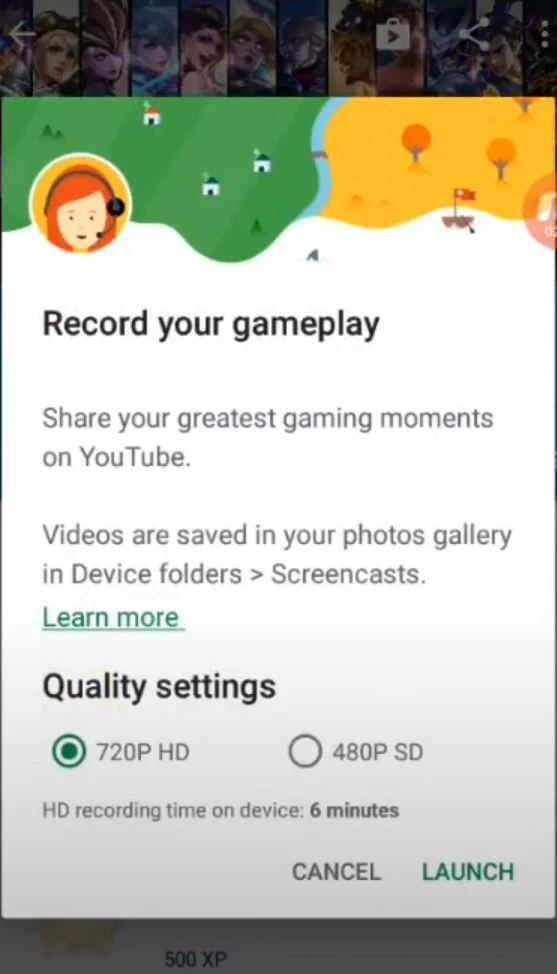
Additionally, the app allows you to record your gameplay and share your best moments with other users. Gameplay recording is available in 480p or 720p resolution.
To record gameplay using Google Play Games on Android, follow these simple steps:
- Install the Google Play Games app from the Google Play Store.
- Open the app and select the game you want to record.
- On the game details page, tap the game recording option.
- Choose the video quality you want and click Next.
- Click on Start, and a movable recording window will appear on your screen with all the necessary icons.
- Click on the recording icon, and the recording will start in 3 seconds.
- To stop recording gameplay, drag the movable recording window to the close icon.
Once the recording is complete, the file will be saved in your device’s gallery, and you will receive a notification saying “Video saved in gallery. Tap the notification to watch the video.”
Google Play Games is a great option for recording gameplay on Android devices, and it’s easy to use for both beginners and experienced gamers.
Third-party Screen Recording Apps on Android
For users with devices running Android versions earlier than 11 or those who require additional features, a variety of third-party screen recording apps are available. In this section, we’ll highlight some of the most popular and feature-rich options.
AZ Screen Recorder
AZ Screen Recorder is a top-rated Android screen recording app that’s available for free download on Google Play. With AZ Screen Recorder, you can easily record your device screen without requiring superuser rights. The app supports Full HD (1080p) video recording at 60 frames per second and features a sliding panel for quick access to controls.
In addition to screen recording, AZ Screen Recorder also offers a built-in video editor that lets you rotate, crop, merge, and compress your videos. You can even use the app’s drawing function to add comments and create drawings as you record.
AZ Screen Recorder allows you to record internal sounds on Android 10 and newer versions, and you can also use your device’s webcam to record your reaction as you record your screen. To start recording, simply shake your device or click on the AZ Screen Recorder widget icon on the side of your screen. You can use the widget icons to stop or pause recording.
Here’s how to record your Android screen using AZ Screen Recorder:
- Install AZ Screen Recorder from the Google Play Store.
- Launch the app and grant the required permissions.
- Click on the gear icon to access the settings and adjust them to your preferences.
- Open the app or screen you want to record.
- Click on the AZ Screen Recorder widget icon and then click the red record button to start recording.
- To stop recording, click on the AZ Screen Recorder widget icon and use the icons to stop or pause recording.
- Your recorded video will be saved in the gallery of your Android device.
AZ Screen Recorder is a powerful and user-friendly screen recording app that’s ideal for recording gameplay, live broadcasts, and video content for YouTube.
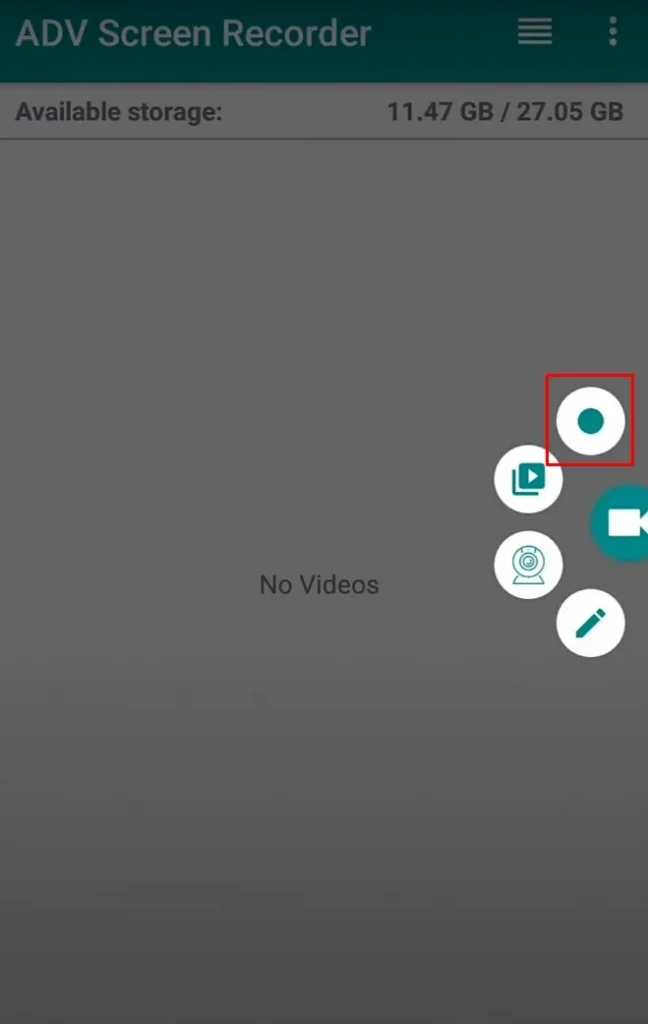
ADV Screen Recorder
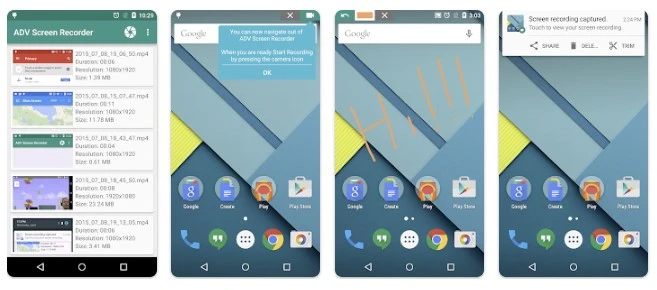
ADV Screen Recorder is a versatile Android screen recording app that allows users to easily record their device screen or create screenshots. The app comes with a variety of features, including the ability to draw annotations manually while recording, mute or turn on sound, and edit recorded videos by adding text and using the cut or paste image tool.
Here’s how to record your Android screen with sound using ADV Screen Recorder:
- Install the ADV Screen Recorder app from the Google Play Store.
- Launch the app and grant the necessary permissions so that the moving widget can appear on your screen.
- Prepare your device screen for recording, and then click on the widget icon (the video camera icon) located on the side of your device’s screen.
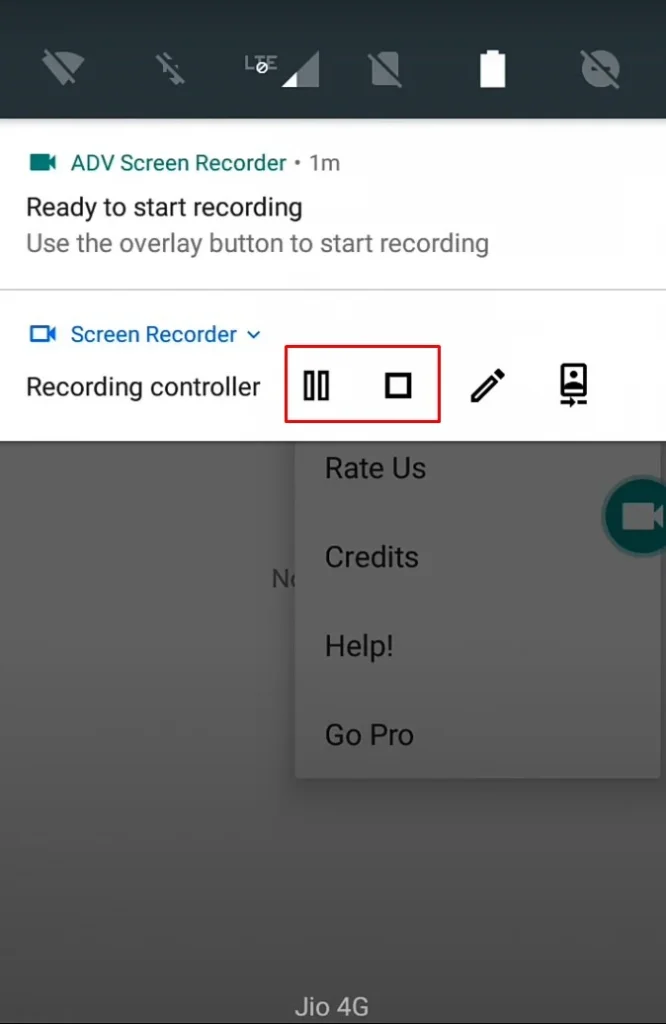
- Once tapped, more items will appear on your screen. Tap the record button to start recording.
- When you’re done recording, tap the ADV widget icon and then the stop or pause button to pause or stop recording.
- Your recorded video will be saved in your device’s gallery. You can also open the ADV Screen Recorder app and view the recorded file.
- In the settings, you can adjust video resolution, bit rate, frame rate, orientation, and other settings according to your preferences.
ADV Screen Recorder is a user-friendly app that offers a range of features for creating high-quality screen recordings on Android devices. Whether you’re recording gameplay, tutorials, or other types of content, ADV Screen Recorder is a great tool to have.
How to Record Android Screen on PC
Recording your Android screen on your PC can be a great way to capture and share content with others. To do this, you need to first download and install a screen recording software on your PC, such as OBS Studio or Camtasia.
- Download and install a screen recording software on your PC, such as OBS Studio or Camtasia.
- Follow our guide to learn how to display your smartphone screen on your computer.
- Choose the option to record your screen, which is typically located in the main interface of the software.
- Select the area of the screen you want to record. You can usually choose between recording the entire screen or a specific window or application.
- Set your recording options, such as the video resolution, frame rate, and audio settings.
- Start recording by clicking the “Record” button in the screen recording software.
- Perform the action or activity you want to capture in your video. You can use any application, website, or software that you want to record.
- When you’re finished recording, stop the recording by clicking the “Stop” button in the screen recording software.
- Preview your video to make sure it captured what you wanted.
- Edit your video as needed using video editing software. You can trim the beginning and end, add annotations, and adjust the audio and visual settings.
- Export your video in your preferred file format, such as MP4 or MOV.
Screen Recording on Android Using ADB (Android Debug Bridge)
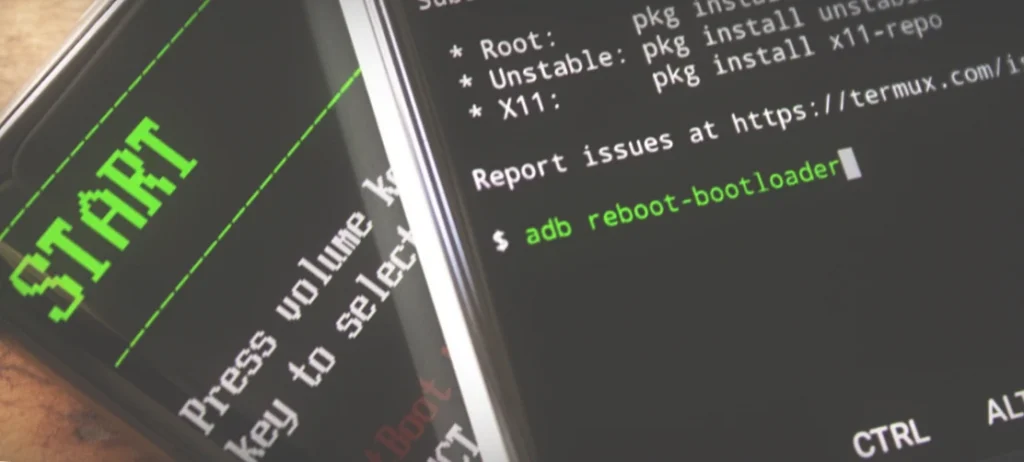
ADB is a command-line tool that allows you to control your Android device from your computer. You can also use ADB to record your Android device’s screen. Here’s how:
- Connect your Android device to your computer via USB.
- Enable USB debugging on your Android device by going to Settings > Developer options > USB debugging and toggling the switch to ON.
- Open a command prompt or terminal window on your computer and navigate to the folder where ADB is installed.
- Enter the following command:
adb shell screenrecord /sdcard/video.mp4 - To stop the recording, press Ctrl + C in the command prompt window.
- The video file will be saved to your device’s internal storage.
If you have any questions about installing ADB, refer to our ADB guide for assistance.
Screen Recording Tips and Tricks
To help you create the best possible screen recordings, here are some tips and tricks:
- Clean Up Your Screen: Close unnecessary apps, notifications, and widgets before recording to reduce clutter and distractions.
- Optimize Your Device: Ensure your device is running smoothly by clearing its cache, closing background apps, and restarting it before recording.
- Use a Tripod or Stand: If you’re recording with a physical setup (e.g., using an external capture device), use a tripod or stand to keep your device steady and prevent shaky footage.
- Plan Your Recording: Outline the content and flow of your screen recording beforehand to help ensure a smooth and coherent presentation.
- Edit Your Video: Edit your recording to remove any mistakes, add annotations, or include additional content (e.g., intro/outro, background music) to make your video more engaging and professional.
Video Instruction
Conclusion
Screen recording on Android is a versatile and valuable tool for creating tutorials, capturing gameplay, or sharing your digital experiences. With the built-in Android screen recording feature, a variety of third-party apps, and external recording options, there’s a solution for every user and situation.
By following this post’s guidance and tips, you’ll be well on your way to creating high-quality and engaging screen recordings on your Android device.
FAQ
Q: Can I record my Android screen without using third-party apps?
A: Yes, if you have Android 11 or later, you can use the built-in screen recording feature. If you have Android 10, you can also activate and use the built-in feature with a few extra steps. Additionally, you can use Google Play Games to record gameplay or use ADB to record your screen.
Q: Are there any good third-party screen recording apps for Android?
A: Yes, there are several third-party apps that can be used for screen recording on Android. Some popular options include AZ Screen Recorder and ADV Screen Recorder.
Q: How can I record my Android screen on a PC?
A: You can record your Android screen on a PC by using screen recording software, such as OBS Studio or Camtasia, and connecting your Android device to your PC via a USB cable.
Q: What are some tips and tricks for screen recording on Android?
A: Some tips include recording in a well-lit area, using headphones to capture audio, and adjusting the recording settings to optimize performance and quality. Additionally, you can use video editing software to trim the beginning and end of your recordings and add annotations or effects.
Q: What is ADB and how can I use it for screen recording on Android?
A: ADB stands for Android Debug Bridge and is a command-line tool that allows you to communicate with your Android device from a computer. You can use ADB to enable screen recording on Android devices that do not have a built-in screen recording feature. To use ADB for screen recording, you need to connect your Android device to your computer via a USB cable, enable USB debugging on your Android device, and run ADB commands in the command prompt or terminal on your computer. You can find detailed instructions and commands for using ADB for screen recording in our guide.